Introduction
One of the beautiful things about working with IaaS is the disposable nature of instances. If they are not behaving properly due to a bug or have been misconfigured for some reason, instances can be terminated and rebuilt with more ease than debugging a long lived and churned through Linux system. As a quality engineer, this dispensability has become invaluable in testing and developing new tools without needing to baby physical or virtual machines.
One of the projects I have been working on lately is an easy deployment of Riak CS into the cloud in order to quickly and repeatedly test the object storage integration provided by Eucalyptus in the 4.0 release. Riak CS is a scalable and distributed object store that provides an S3 interface for managing objects and buckets.
Before testing the Eucalyptus orchestration of Riak CS (or any tool/backend/service that Euca supports for that matter), it is important to understand the basic activities that Eucalyptus will be performing on behalf of the user. Thankfully, Neil Soman wrote a great blog post about how our Riak CS integration is designed.
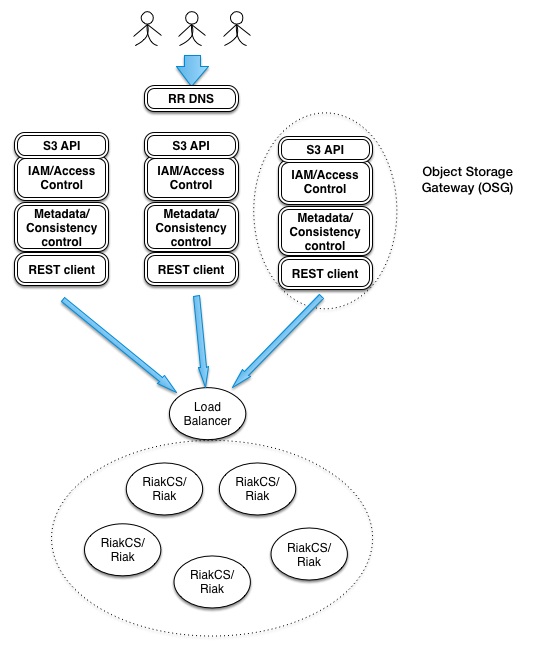
In this model we can see that we require:
- A multi-node Riak CS cluster
- A load balancer
- A machine to run the Eucalyptus Object Storage Gateway (OSG)
This topology is extremely simple to deploy in Eucalyptus 3.4 using our ELB and by using Vagrant to deploy our Riak CS cluster. Here’ s how to get your groove on.
Prerequisites
- CentOS 6 image loaded into your cloud
- Keypair imported or created in the cloud
- Security group authorized for port 8080,8000 and 22
- Install Vagrant
Deploy Riak CS
In order to deploy Riak CS in our cloud we will use Vagrant+Chef+Berkshelf as follows:
- Install Vagrant plugins using the following commands:
-
vagrant plugin install vagrant-berkshelf
vagrant plugin install vagrant-omnibus
vagrant plugin install vagrant-aws
-
- Import the dummy vagrant box necessary to use vagrant-aws:
-
vagrant box add centos dummy.box
-
- Clone the following repository
-
git clone https://github.com/viglesiasce/vagrant-riak-cs-cluster.git
-
- Edit the following items in the Vagrantfile to reflect the pre-requisites above and to point to your target cloud
- aws.access_key_id
- aws.secret_access_key
- aws.keypair_name
- aws.ami
- override.ssh.private_key_path
- aws.security_groups
- aws.endpoint
- Set the number of nodes to deploy at the top of the Vagrantfile:
- Once the cloud options are set start the Vagrant “up” process which will deploy the Riak CS nodes and Stanchion:
-
RIAK_CS_CREATE_ADMIN_USER=1 vagrant up --provider=aws
-
- Once Vagrant is complete, login to the first Riak CS node to get its private hostname:
-
vagrant ssh riak1 -c "curl http://169.254.169.254/latest/meta-data/local-hostname"
-
- Join each node to the first that was deployed. For example, to join the second node to the cluster I would run:
-
vagrant ssh riak2 -c "riak-admin cluster join riak@<riak1-private-hostname>"
vagrant ssh riak2 -c "riak-admin cluster plan; riak-admin cluster commit"
-
In order to get your access and secret keys login to http://riak1-public-ip:8000
Load Balance Your Riak CS Cluster
- Create an ELB with the following command:
-
eulb-create-lb -z <AZ-of-your-riak-nodes> -l "lb-port=80, protocol=TCP, instance-port=8080,instance-protocol=TCP" RiakCS
-
- The command above will return you the DNS name that you will use as the endpoint for the “objectstorage.s3provider.s3endpoint” property when setting up the OSG. From the sample output below we would use “RiakCS-229524229045.lb.home”
-
DNS_NAME RiakCS-229524229045.lb.home
-
- Register your Riak CS nodes with that load balancer:
-
eulb-register-instances-with-lb --instances <instance-id-1>,<instance-id-2> RiakCS
-
You have now successfully deployed a Riak CS cluster. You can stop here if you’d like but the real fun starts when you add IAM, ACL, versioning, multipart upload, and bucket lifecycle support to the mix using the Eucalyptus OSG.
True enthusiasts continue below.
Install and Configure the Eucalyptus OSG Tech Preview
- Spin up another CentOS 6 instance in the same security group as used above
- Follow the instructions found here to finish the OSG installation and configuration, remember to use the DNS name returned in step 1 from above as the s3endpoint:

Reblogged this on More Mind Spew-age from Harold Spencer Jr. and commented:
Some insight on RiakCS integration with Eucalyptus thats coming down the road…
Hi,
I made a similar script a couple of days ago with ansible.
Here’s the link to the playbook if you want to check it out:
https://github.com/ilatvala/euca_riakcs
Awesome! Thanks Ilpo.